Friday 30 September 2011

Chicken Parmesan


     One of my all time favorite dishes is Chicken Parmesan, it's the crisp breading, the melted cheese and the homemade tomato sauce...what's there not to love?  I was treading on dangerous ground though as we had Chicken Piccata and Thai Green Curry with Chicken last week and my partner is not the biggest fan of chicken, but what the heck, right?  He loved both those dishes (always does) and I thought, why not push the envelope a bit.

     I had very little of my bread crumbs left and as I didn't feel like toasting and smashing up some new ones, I mixed what I had with a little Panko which I had never done before.  I seasoned my crumbs with Oregano, Basil, Salt and fresh cracked Black Pepper...just the basics.  I dragged my chicken in a bit of beaten egg and crusted them in my crumb mixture. 

     In a nice hot pan with a mix of Extra Virgin Olive Oil and a pad of Non-Salted Butter, I cook each side until they are both golden brown.  Once that is achieved I place them in the oven to finish cooking while I make the Caesar Salad (I always use grated Parmigiano-Reggiano and chopped Romaine Lettuce), and then the pasta.  The trick to great chicken is not to over bake it and let it dry out, it is always best when it is still moist and juicy.

Cooking up in the pan
     In our family we grew up making our own sauce and mom would freeze any extra for the next time it was needed.  I continue that tradition as it is easy to do and the end result is always more satisfying for me knowing it didn't come from a jar.  I always start with what I consider the basic ingredients for my sauce and then add to it whatever I have in the house and suits my fancy for the day, last night it was mushrooms.

4 Small Cloves of Garlic, minced
1/2 Medium Onion, chopped
6 Crimini Mushrooms, chopped small
5 Shakes from the Basil jar
5 Shakes from the Oregano jar
1 Bay Leaf
Salt and Pepper to taste
1 Small Can Tomato Paste, I use the whole can...
1 Large Can Tomatoes, last night I had San Marzano... 
2-3 Teaspoons of White Sugar

     I saute the onion and mushrooms in a few tablespoons of Extra Virgin Olive Oil and a pad of butter with the seasoning's.  When they are soft and only slightly browning, I add the garlic and pull the pot off of the stove so I can mix it all together.  It helps the garlic from burning if it is not over the direct heat.  I add my tomato paste, stir....over the heat for about a minute and add my tomatoes. 

     You can always add a liquid to the sauce as well, some use water, some use tomato juice, and some even use tomato soup...I will leave this one up to you.  Personally, I choose between an actual can of tomato sauce, tomato juice if I have it or water, for me it's whatever is on hand.

     Sometimes I add fresh tomatoes if I have them and if you do, this is the time to throw them in.  Let this simmer together awhile and taste.  Usually the tomatoes are highly acidic, so this is when I toss in my sugar, it helps to sweeten things up a bit and creates a nice balance.  Simmering this sauce for anywhere between 45 minutes and a hour and it's done, it reduces down a bit, the flavors meld together and is normally delicious.

     Last night I cooked my tomato sauce for a little over an hour only because we weren't ready to eat yet : )  the longer it simmers, the yummier it is...is yummier a word? Why yes, in my kitchen it is!

    
     I served my Chicken Parmesan with fresh (store bought) linguine.  I used white cheddar melted on the chicken as I didn't have mozzarella and finished it off with a bit of grated Parmigiano-Reggiano on top of it all.  When I cook I like to wing it sometimes with what I have in the house, and again last night...dinner turned out fantastic and it was a great Chicken Parmesan even without the proper cheese.

Thursday 29 September 2011

Squishing Grapes - Making Wine


We are not going to be squishing the grapes with our feet : ) Not today....

Here the grapes are shown in their new plastic bins, normally always shipped in wooden crates...

They are put through a grinding machine by two people feeding the machine where the grapes are stripped from the stems while three people pull out the largest of the stems and any leaves that made it by the people feeding the machine.

The reds are still delivered in the wooden crates...We used two different kinds of red California grapes.  There were around 82 cases between all three different types of grapes.

The squisher...or grinder...(I like squisher)

A holding tank...one of two (er, three actually)...

The wooden holding box for the green grapes...I got a shot while everyone was taking a break...


Fun was had by all this day, as it was my first time participating in such a popular event, everything was brand new to me.  I cannot say yet that I know anything about making wine but can say I know how to squish a grape.  Our new friends who were kind enough to invite us to join them have been doing this for years and will be pressing the grapes when they are ready.  The rest of the process may very well be top secret, I'm not sure : )  But I must send out many thanks to them for a great day...we enjoyed lovely fresh ground coffee to start the day with my just baked that morning Blueberry muffins, a hearty and delicious lunch with afternoon snacks and a fun chicken fried dinner... not to mention the wine we consumed throughout the process.  Thank you, Thank you, Thank you!

A nice cluster of green grapes to snack on, yum! Good picking my new friend...


Wednesday 28 September 2011

Barbecuing Baby Back Ribs


     I know that there is a lot of talk already surrounding Fall food...root vegetable dishes, soups, stews, chili and the like, but I am just not ready yet to change with the season.  Since the weather is still beautiful though slightly cool, I figure I do not have to.  There will be plenty of time for that soon enough as we have a very, very long winter here and tons of time for winter fare.

    I say bring on the barbecue baby, don't be shy, break out those Baby Back Ribs, oh my!

     I like to start with a nice dry rub and let the ribs marinate in that for an hour minimum and up to four hours maximum (personal preference), you can certainly let them sit for as long as 24 hours if you like.  I first rinse and pat dry my rack of ribs.  I then remove the thin membrane from the back side of the rack.  Many people argue whether it is necessary or not, for me, I truly believe the rub has a better chance of flavoring your pork if it is removed.  There is also a debate on which is better, sweet or spicy and dry or wet.  I like it all so I just go for it : )  I start with two full racks of ribs, there is plenty of rub left over after making it for either more if you're having company or for saving it till later.

     Jenn's Dry Rub, A mix of Sweet and A little Heat...

     3/4 Cup Brown Sugar
     3/4Cup White Sugar
     1/2 Cup Paprika
     1-2 Tablespoon Chili Powder
     2 Tablespoons Ground Ginger
     2 Tablespoons Rosemary (Fresh chopped is best)
     2 Tablespoons Black Pepper
     1/4 Cup Salt (I only use Kosher)
     1-2 Tablespoon Cayenne Pepper (Dependent on how hot you like it)    

     Rub some of the mixture over both sides of the racks of ribs and let rest for desired time.  Don't be shy, I am very liberal with the rub mixture as I believe the more you have the more flavorful your meat will turn out.

     When you are ready, heat the Barbie!

     I place the bottom section of my broiler pan on my grill with preheated water (hot) inside and bring my temperature up to around 300-350 degrees.  I place my ribs already sitting on top of the broiler pan on top of the bottom section and close the lid letting them heat for 30 minutes.  I think of it as the time it takes to heat the outside of the ribs and create a crust or bark dependent on what you like to call it.  It seals in some yummy juices and helps the pork to brown nicely for the rest of the cooking process.


In the beginning

     After thirty minutes, I turn my temperature down to 225 degrees and I let those babies cook for 3-3.5 hours depending on their size and thickness until they are ready for basting.  Turn the ribs over every 30 minutes or so but no sooner as you want the temperature in the barbecue to stay steady at 225 degrees.    

     Check when you are turning your ribs that the water in the broiler pan has not evaporated and if it is low, refill it with HOT water so as not to bring the temperature of the barbecue down too much.  I resist the urge to open the lid in between turning times as I like the saying...if you're looking, you're not cooking.

     When you are ready, bast your Baby Back Ribs with your favorite barbecue sauce.  If you like your ribs dry, you can skip the basting all together, but for me, I love the sauce!  I have gone back and forth between ready made from the store and my own creations, just depends on the day and my energy level.

     When you are ready to baste the ribs, remove the broiler pan and turn the heat up on the grill.  Place the ribs directly on the grill racks and start slathering away.  It only takes a few minutes for your sauce to caramelize on each side and once that happens, you are ready to head back into the kitchen for dinner.


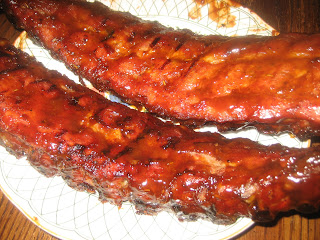
Close up


It is an investment of your time, but Sooo worth the effort, you are going to love them!


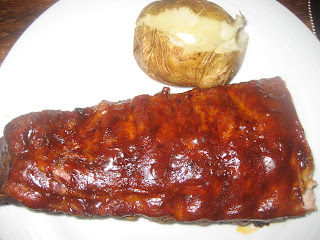
Just in from the Barbecue

Getting ready to go in our belly : )


Friday 23 September 2011

Blueberry Muffins


    The phone rang at nine this morning, the call was for 6 muffins by 10am for a breakfast meeting, and could I supply them.  I mentally went through the cupboards checking off what I would need and remembered the blueberries in the refrigerator.  Sixty minutes I thought....if I could make dinner in sixty minutes I knew half a dozen muffins shouldn't be a problem.  I was off and running...um, I mean baking...now I just wondered...where had that recipe gone off to I had used?


Blueberry Muffins

1 1/2 Cups Flour
3/4 Cup White Sugar
1/2 Teaspoon Salt
2 Teaspoon Baking Powder
1/3 Cup Vegetable Oil (I use Canola)
1 Egg (I use a lg egg)
1/3 Cup Milk (I use 2%)
1 Cup Blueberries (Fresh)


Crumb Topping

1/2 Cup White Sugar
1/3 Cup Flour
1/4 Cup + 1 Tablespoon Cubed Butter 
2 Teaspoons Cinnamon
Mix crumb topping ingredients together with a fork...there will be a fair amount leftover unused...


Pre-heat Oven to 400 degrees, grease inside and top of muffin pan
Mix Flour, Sugar, Salt and Baking Powder (I either whisk together or sift it and whisk together)
Place Oil and egg in a 1 cup measuring cup, add milk to fill the one cup
Mix the wet mixture into the dry ingredients BUT don't over mix! only mix till combined
Fold Blueberries into mixture, gently...gently...
Fill muffin pan cups till full
Sprinkle Crumb mixture on top (oh...about 1 Tablespoon)

Bake for about 25 minutes or until an inserted toothpick comes out clean


Very Yummy!  The mix is thick but don't worry about that as it helps the Blueberries not to sink to the bottom of the cup.  I have to taste test of course!


     A few weeks ago I searched and searched for a good Blueberry Muffin recipe and after combing online for awhile I finally decided on this one, They have come out great each time I have made them.  The only thing I do differently is add more cinnamon and more butter to the crumb topping.  I also never use paper liner cups unless I am making cupcakes for children.  It wouldn't be right for me not to share the source, so...I found the original recipe at
http://allrecipes.com/Recipe/to-die-for-blueberry-muffins/detail.aspx

I have seen recipes very, very similar to this one yet don't see any attribution given, maybe they are great muffin recipe creators, until I am...I must share my secret : )  Enjoy!

Wednesday 21 September 2011

Stuffed Chicken Breast


     I find that a lot of recipes can be over complicated and I spend more time trying to get the steps correct and less time enjoying the process of making the dish.  So, here I try to share with you what I used and a simple explanation of how I cooked it.  I have made this dinner recipe over and over since I loved it so much but have continued to change it up a bit each time I have made it.
     This recipe came about because I wanted to stuff a few Chicken Breasts for dinner, but only wanted to use what was in the house instead of going to the market to buy special ingredients.  You can do this too with whatever you have in the kitchen that sounds good with Chicken.  Play around and be creative! Don't limit yourself because you don't have all the ingredients a recipe may call for...work with what you have and what you love.  Bon Appetite!

Spinach, Feta and Mushroom Stuffed Chicken Breasts

4 Chicken Breasts
4-5 Minced Garlic Cloves
1-2 Minced Shallot
4-5 Cups Fresh Spinach
4-5 Fresh Minced Crimini Mushrooms
3/4 Cup Fresh Crumbled Feta Cheese
1-2 Tablespoons Pine Nuts
Black Pepper
Sea Salt
Extra Virgin Olive Oil

Saute Shallot and Mushroom in oil till soft, season with S&P, add Garlic and stir for approx. 2 minutes but don't burn the Garlic!  Add Spinach and saute only till Spinach is wilted.  Set aside to cool.  Once cooled add your Feta Cheese and Pine nuts and mix.
Butterfly your Chicken Breasts (slice in half about 3/4 of the way to make a pocket for the stuffing).
Stuff your Chicken Breasts with your filling and wrap with kitchen string to hold everything together nicely.
Heat Olive Oil in a saute pan and brown Chicken till golden brown.  Place on a shallow pan in a 350 degrees oven to finish cooking, internal temperature should be 165 degrees for Chicken to be cooked thoroughly.  Don't overcook the Chicken as it will dry out.
Don't forget to remove the kitchen string before serving : )

Serve your chicken dinner with preferred sides, Delicious!

Monday 19 September 2011

Frito Pie Anyone?


     I remember the first time a friend made me their version of Frito Pie, I thought...seriously?  I had never heard of Frito Pie before.  It sounded strange, although I did grow up a fan of Frito's, so...I figured, why not? Okay, let's give it a try.      
     Needless to say, I loved it and turned out to be a Frito Pie fan, and although it wasn't the healthiest of dishes, it was in fact something I would call fun food.  It's great for a sports event get together with friends or a quick and easy meal when you are craving something along the lines of nachos or taco dips.
     I made a few changes to the Frito Pie recipe as I do not like it with chili as much as I do with ground burger.  I also love a really sharp cheddar and always use the Barbecue chips vs the regular ones.  I never eat it out of a bag even though a lot of tradionilists say Frito Pie MUST be eaten that way, I always use a pie pan.

Frito Pie

1 bag of Barbecue Frito Lay Corn Chips http://www.fritos.com
1 lb of lean ground beef
1 garlic clove, minced
1/2 small yellow onion, diced small
1 can corn niblets
Very Sharp Cheddar, shredded...A few handfuls (brand is up to you, I always liked Tillamook) http://www.tillamook.com

Brown your burger with the onion adding the garlic last so it doesn't burn and drain any grease if needed.  Layer the meat mixture into the bottom of a pie pan adding a layer of corn niblets next, add shredded Cheddar cheese and top with Fritos.  Bake in a pre-heated oven (350 degrees) until the Frito's are lightly browned.  The cheese will have melted by now and mixed in with the corn and meat mixture.  Remove from the oven and serve, delicious!

There are many options for Frito Pie toppings such as diced Tomatoes, sliced or minced Jalapenos, chopped Onion, chopped Lettuce, sliced Green Onion, diced Avocado, Sour Cream...the sky is the limit when it comes to toppings.  Enjoy.

No Photo available as I can't get Frito's anymore where I live, I know...weird huh?

Friday 16 September 2011

Make someone smile


     Wrap up a plate of yellow cheer with Lemon Madeleines.  Take to a loved one's to cheer them up or just to enjoy a special treat together.  Always at their best served the same day and especially still warm, fresh from the oven.


I don't share a recipe here as I have yet to find one I love 100%.  Each time I make them I experiment with the batter and the different flavors.  These were by far my favorites though, I love lemon.

Here are a few of my favorite links for you to try next time you are looking for a treat to serve with coffee or tea.


Just be sure to use the Madeleine pan for that fun shape!


Wednesday 14 September 2011

Under Renovation


     Since I am brand new to this blogging world I have been taking time to do some studying and researching on how to do it properly and still have fun.  Hang in there with me as I have new posts coming soon!  It has already been a blast so far...
                                           Thanks, and see you soon.

Tuesday 6 September 2011

Are you eating my flowers?


     Are you eating my flowers? You just might be...I know I am.  One of the nice things about growing edible flowers of course besides their beauty is the joy of plating them and eating them!  This is not a new idea just one that had gone to the wayside and is now enjoying a comeback in the world of garnishes.
     While some may push them to the side of the plate, I make sure to eat them along with what they are there to highlight.  Nasturtium flowers were my choice this year to grace the side of my home and they did not disappoint.  Running along the length of the flower bed they have filled out and spilled over producing a wealth of colorful gems not only good enough to look at, but also to eat.
     Sharing them recently with a local restaurant to plate with their desserts has added to my personal happiness.  We all know that it is in the sharing with others that we receive our greatest internal pleasure.  So, next planting season think edible when putting in your flowers, not just for your vases but for your dinner table as well.  The leaves are slightly peppery and make a wonderful addition to a salad and the flowers themselves can be used in a lot of different recipes, not just for garnishing.


Thursday 1 September 2011

Our Garden Bounty


     I know some might snicker, tee hee, but truth be told...this is my very first vegetable garden and I only planted a couple of plants.  With all of the flower gardens I have cultivated over the last few decades I am surprised I have never tried fruits or vegetables before now.
     Our growing season is very, very short here and I am blessed, grateful and delighted to be able to pick anything from our plants at all.  I still have many on the plants in different stages of growth but these babies were ready to come off and prepare to be eaten.
     Though they were not ripening on the plant, they are now doing quite well in a darkened closet hiding within newspaper and at different stages of ripeness, I am excited to share with you our first harvest.

Our Husky Cherry Red Tomatoes


Easy Quiche


     Forty eight hours before shopping day finds me scouring the cupboards to find the answer to What's for Dinner today?  I've made some tasty meals this week with it being the last week before grocery shopping, and I find I am pretty proud of my results. 
     Using the last three chicken breasts in the freezer I managed to pull together one of my favorites, Chicken Parmesan.  Having only a few mini Bocconcini balls left in the drawer I simply sliced them up for the cheese topping and found that it was just enough to cover the breasts.  While I had no bread crumbs and no bread to make do, I simply dredged the chicken in some seasoned flour before pan frying them in a little Extra Virgin Olive Oil and a bit of butter.
     I truly am a fan of homemade sauce and managed to pull this off well with the constant staple in the house, garlic, combined with a few very ripe tomatoes, the last can of tomato paste, and the last can of crushed tomatoes.  There was even a half bottle left of the beautiful red wine we shared on my sweethearts birthday last week.  Add all of that together with some sauteed diced onions and peppers and you have all the makings for a great sauce.
   The feeling is nice when your partner shares with you that he swears he can't remember ever having a better Chicken Parmesan.  Now that's pulling magic out of some near empty cupboards.  My next dinner was a yummy Jumbo Shrimp Red Curry dish with Basmati Rice.  With only eight shrimps left, it was a perfect serving for each of us, these shrimp are really jumbo : )
     What was I going to do tonight though I was left wondering.  The freezer held a few pie shells and some Kaffir Lime Leaves and a half bag of peas, besides the ice cream of course, but we couldn't eat that for dinner, could we?  I had used all of the meats and seafood and the bare frig held very few vegetables, a few bits of cheese, a couple of eggs, and two pieces of thick sliced bacon.  The cupboards were sparse although there were a few cans of soup for those easy throw together lunches.  Hmmm...Ah......a light bulb moment, I had a plan. Did I have cream? No.  Was there half and half? No.  What to do, what to do.
     On the Web there is a wealth of information at our fingertips, I love it.  Anything I need to know is only a few keystrokes and a click away.  So....was there a substitute for heavy cream? Yes, a little melted butter mixed with a cup of milk was all that was needed.  So, what was the answer to "What's for dinner tonight?" Quiche of course!  Easy Schmeasy. 

Bacon and Cheese Quiche with Roasted Red Pepper and Butternut Squash Soup.

My first step was to dice up and saute the two pieces of bacon and drain on a paper towel, saute the red and green pepper, onion and some mushroom and I have my filling.


Next step...grate the small bit of Cheddar and Parmesan Cheese I found


Mix the meat and vegetable filling with the cheese


Mix four eggs, a tablespoon of melted butter with a cup of milk and pour over the vegetable and bacon mix in the pie pan.  Bake at 400-450 degrees for about 15 minutes and then lower the temp to 350 degrees and finish cooking till the top is a golden brown, approx. another 25 minutes or so.


For coming up with the idea and being able to pull it off with what felt like close to nothing at all in the frig, I can say, another yummy dinner was had by all.


Related Posts Plugin for WordPress, Blogger...